7 Streams, redirection and piping
Remember that we have provided a list of helpful tips and hints in the appendix: Section A.1.
Up until now, most of the commands that we have used, printed their output directly to the terminal screen. But what if we want to save that output to a file? Or similarly, if we want to run program X on the output of program Y? This is where redirection and piping come into play. But first, we will have to briefly introduce the concept of streams.
7.1 Streams
The general flow of Unix commands is that we supply a specific input on the terminal, which is supplied to a command, and any output is printed back to the terminal screen. In other words, processes have three different data streams connected to them.
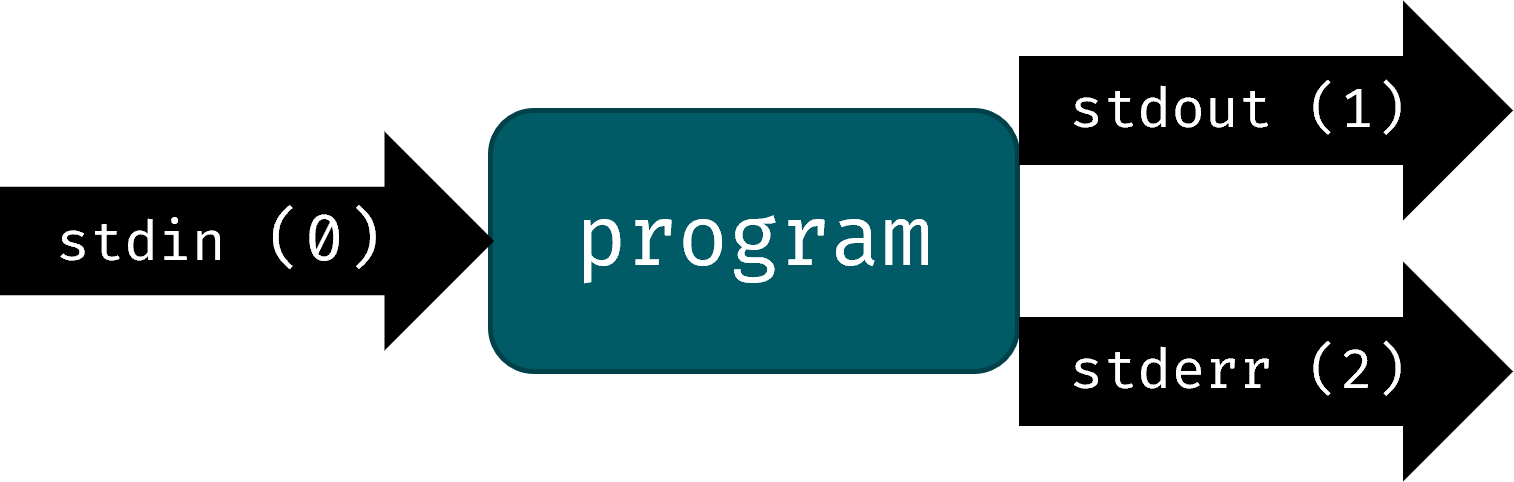
The output for most commands, like that of echo, cat and ls, is called the standard output or stdout, and it is printed to our terminal screen by default. However, there exists another output stream in Unix, namely the standard error or stderr. This stream will contain error or warning messages produced by commands, and it is also printed to the terminal screen by default. There also exists an input stream, called standard input or stdin, which provides the data that is fed into a program.
Redirection and piping allows us to make these data streams go to or come from another file or process, instead of the terminal. Connecting these streams in different combination allows us to perform all kinds of useful operations.
7.1.1 Redirecting output
One of the most common uses of redirection is redirecting the output to a file. For this, we make use of the greater than operator >:
$ ls > redirected_output.txt
some     files     in   a   directory

$ cat redirected_output.txt
some     files     in   a   directory
In the example above, the output of ls was not printed to the screen, but redirected to a file named ls_output.txt. Note that if the file does not exist, it will be created for us. However, if the file already exists, it will be overwritten (i.e., its contents will be removed entirely and replaced by our new output).
A related operator is >>. It will behave similar, with the difference being that >> will instead append its output to existing files, rather than overwriting them.
$ ls > redirected_output.txt
some     files     in   a   directory

$ echo "A second line!" >> redirected_output.txt

$ cat redirected_output.txt
some     files     in   a   directory
A second line!
Technically, whenever we use redirection, we are targeting a specific stream. Stdout is the default stream, so in the previous examples, > and >> were actually shorthand for 1> and 1>>.
As a more concrete example, we can use the redirection operator to store the results of a grep search.
$ grep "contig" ampliseq-variants.vcf > vcf-contigs.txt
$ cat vcf-contigs.txt
##contig=<ID=Pf3D7_01_v3,length=640851,assembly=PlasmoDB-44_Pfalciparum3D7_Genome.fasta>
##contig=<ID=Pf3D7_02_v3,length=947102,assembly=PlasmoDB-44_Pfalciparum3D7_Genome.fasta>
##contig=<ID=Pf3D7_03_v3,length=1067971,assembly=PlasmoDB-44_Pfalciparum3D7_Genome.fasta>
##contig=<ID=Pf3D7_04_v3,length=1200490,assembly=PlasmoDB-44_Pfalciparum3D7_Genome.fasta>
##contig=<ID=Pf3D7_05_v3,length=1343557,assembly=PlasmoDB-44_Pfalciparum3D7_Genome.fasta>
##contig=<ID=Pf3D7_06_v3,length=1418242,assembly=PlasmoDB-44_Pfalciparum3D7_Genome.fasta>
##contig=<ID=Pf3D7_07_v3,length=1445207,assembly=PlasmoDB-44_Pfalciparum3D7_Genome.fasta>
##contig=<ID=Pf3D7_08_v3,length=1472805,assembly=PlasmoDB-44_Pfalciparum3D7_Genome.fasta>
##contig=<ID=Pf3D7_09_v3,length=1541735,assembly=PlasmoDB-44_Pfalciparum3D7_Genome.fasta>
##contig=<ID=Pf3D7_10_v3,length=1687656,assembly=PlasmoDB-44_Pfalciparum3D7_Genome.fasta>
##contig=<ID=Pf3D7_11_v3,length=2038340,assembly=PlasmoDB-44_Pfalciparum3D7_Genome.fasta>
##contig=<ID=Pf3D7_12_v3,length=2271494,assembly=PlasmoDB-44_Pfalciparum3D7_Genome.fasta>
##contig=<ID=Pf3D7_13_v3,length=2925236,assembly=PlasmoDB-44_Pfalciparum3D7_Genome.fasta>
##contig=<ID=Pf3D7_14_v3,length=3291936,assembly=PlasmoDB-44_Pfalciparum3D7_Genome.fasta>
##contig=<ID=Pf3D7_API_v3,length=34250,assembly=PlasmoDB-44_Pfalciparum3D7_Genome.fasta>
##contig=<ID=Pf_M76611,length=5967,assembly=PlasmoDB-44_Pfalciparum3D7_Genome.fasta>
In the example above, we searched for lines containing the word contig in a .vcf file and stored the output in a file called vcf-contigs.txt, instead of just printing the output to the screen. But what is a VCF file anyway?
7.1.1.1 VCF files
VCF is the de facto file format for storing gene sequence variation data. It is a plain text file with tab-delimited columns preceded by header lines with additional metadata (starting with ##), similar to the structure of a BAM file.
An example of a VCF file is provided below1:

For now, the most important aspect to remember is that each of the lines in the body of the file store information on the presence of an indel at a particular position in the genome. There are eight mandatory fields for each variant, but the format is flexible and additional fields can be used to store extra information:
| Field | Name | Description |
|---|---|---|
| 1 | CHROM | The name of the sequence (typically a chromosome) against which a variant is compared. |
| 2 | POS | The reference position. |
| 3 | ID | The identifier of the variant. |
| 4 | REF | The reference base occurring at this position in the reference sequence. |
| 5 | ALT | The list of alternative alleles found in your samples at this position. |
| 6 | QUAL | A quality score associated with the inference of the given alleles. |
| 7 | FILTER | Indicates which filters the variant has passed. Used as a quality control. |
| 8 | INFO | Additional info about the variant can be stored here as key-value pairs. |
For a more in-depth view, we refer to the following excellent resources:
- https://gatk.broadinstitute.org/hc/en-us/articles/360035531692-VCF-Variant-Call-Format
- https://davetang.github.io/learning_vcf_file/
Similar to SAM/BAM files, there is also a binary version of VCF, namely BCF (Binary variant Call Format). Moreover, like samtools was developed to handle SAM/BAM files, there is dedicated program named bcftools that can be used to work with VCF/BCF files.
7.1.2 Redirecting errors
Without redirection, most commands print their error and warning messages to the terminal screen. If we use > (or 1>) to redirect the output stream, the stderr will still be printed to the screen (and not be stored in the file that we are redirecting to). To redirect and store the error messages, we need to specify stderr as the stream via 2<.
# cat on two files normally prints the output of both,
# but in this case fake_file does not exist
$ cat real_file fake_file
foobar
cat: fake_file: No such file or directory

# when we redirect stdout to a file
# stderr is still printed to the screen
$ cat real_file fake_file > redirected_output.txt
cat: fake_file: No such file or directory

# when we redirect stderr to a file
# stdout is still printed to the screen
$ cat real_file fake_file 2> redirected_errors.txt
foobar
If we want to redirect both stdout and stderr, we have to use a slightly more complex command:
# redirect both stdout and stderr to a file
$ cat real_file fake_file > redirection.txt 2>&1

$ ls redirection.txt
foobar
cat: fake_file: No such file or directory
7.1.3 Input redirection
The input stream (stdin) can also be redirected. Most commands like cat can open and process a file, but some commands cannot operate directly on a file. Instead, they need to be supplied with data directly. This is where input redirection (<) comes in. We have not yet encountered any commands that need to work on however, so the example below would work equally well without input redirection.
$ cat < input_file.txt
lines in
input_file.txt
7.1.4 Overview of redirection operators
| Redirection operator | Result |
|---|---|
command > file |
write stdout to file, overwriting if file exists |
command >> file |
write stdout to file, appending if file exists |
command 2> file |
write stderr to file, overwriting if file exists |
command > file 2>&1 |
write both stdout and stderr to file, overwriting if file exists |
command < file |
read input from file and pass it to command |
7.2 Piping
Piping allows us to redirect the output of one command, to the input of another command. It is the more common way of redirecting the input stream. Pipes can chain multiple commands one after another so that a complex series of steps can be run in one go, without any intermediary output files. In its simplest form, piping looks like this:
command_1 | command_2Where the first command produces some kind of output that can be used by the second one. For example, we could pipe the output of ls to grep to search through a list of directories and files:
$ ls
PF0080_S44_L001_R1_001.fastq.gz  PF0157_S55_L001_R2_001.fastq.gz  PF0329_S56_L001_R1_001.fastq.gz
PF0080_S44_L001_R2_001.fastq.gz  PF0275_S68_L001_R1_001.fastq.gz  PF0329_S56_L001_R2_001.fastq.gz
PF0097_S43_L001_R1_001.fastq.gz  PF0275_S68_L001_R2_001.fastq.gz  PF0512_S47_L001_R1_001.fastq.gz
PF0097_S43_L001_R2_001.fastq.gz  PF0302_S20_L001_R1_001.fastq.gz  PF0512_S47_L001_R2_001.fastq.gz
PF0157_S55_L001_R1_001.fastq.gz  PF0302_S20_L001_R2_001.fastq.gz

# search through the list of files in the
# current directory for a particular sample name
$ ls | grep "PF0275"
PF0275_S68_L001_R1_001.fastq.gz
PF0275_S68_L001_R2_001.fastq.gz
Note that in this case the syntax of grep "pattern" <file> changes slightly: we only supply the pattern, and the target file is now replaced by the stdout stream of ls. Piping makes it a lot more convenient to manipulate and chain commands in this manner. Doing the same thing without making use of piping takes a lot more work:
# write the output of ls to a file
$ ls > ls_output.txt

$ grep "PF0275" ls_output.txt

$ rm ls_output.txt
Clearly, the above approach is not very convenient. Especially if you consider the fact that you can chain as many pipes and redirections as you want: command < input.txt | command | command > output.txt. Let’s take a look at a few more examples:
grep matches using a pipe instead of the -c flag. (Click me to expand!)
# count the number of matches in grep search results
$ grep "pattern" file | wc -l
grep will return a single line for each match that it finds. These lines are passed to the stdin of wc -l, which will count the number of lines.
# consider a file with non-consecutive duplicate lines
$ cat file.txt
a
a
b
c
b

# using uniq will only remove the consecutive duplicate line
$ uniq file.txt
a
b
c
b

# if we first sort and then run uniq, we get the desired output
$ sort file | uniq
a
b
c
sort will sort the file alphabetically, which results in all duplicates on consecutive lines. If we then pipe this output into uniq, all duplicates will be removed.
Here is another example of how to use pipes, this time applied to the SAM files that we saw earlier. SAM files sometimes contain a few lines of additional information - called the header and starting with an @ symbol - before the start of the tab-delimited alignments (1 read per line). If we were to use the cut command to extract a particular column from such a file, the first few lines matching the header would cause problems, because these lines do not correspond to the tabular structure of the rest of the file.
cut -f10 command to only the lines after the header? (Click me to expand!)
# count the number of lines in the header
$ grep -c "@" alignment-with-header.sam
2

# use tail -n +3 to print the output of the file starting
# the 3rd line, then pipe this output into the cut command
$ tail -n +3 alignment-with-header.sam | cut -f10
TTAGATAAAGAGGATACTG
AAAAGATAAGGGATAAA
AGCTAA
ATAGCTCTCAGC
TAGGC
CAGCGCCAT
aggttttataaaacaaataa
ggttttataaaacaaataatt
ttataaaacAAATaattaagtctaca
CaaaTaattaagtctacagagcaac
aaTaattaagtctacagagcaact
Taattaagtctacagagcaacta
We use the tail command to first extract the parts of the file that we are interested in, and then feed this output into the cut command to select a particular column (in this case, the 10th column corresponds to the sequence).
As a final tip on the usages of piping, consider that you can pipe the output of any command to | less. This is extremely convenient whenever the output of a particular command is too long and does not fit on your terminal screen. Of course, in some situations you are probably better of storing the output in a file using a stdout > redirection.
7.3 Further reading
Redirection operations and pipes can be combined in many more complex ways than what we saw here. For example, in case we want to redirect output to both a file and the terminal, we can make use of the tee command, as described here. It is even possible to create more complex nested processes, where you feed the output of multiple different commands into a single command: diff <(ls old) <(ls new); this is called process substitution.
You do not need to concern yourself with learning these more advanced concepts for the time being, but just keep in mind that whatever you want to do, the Unix shell likely offers a way of doing it.
7.4 Exercises
- Search for the DNA sequence “aacct” in the truncated human Y chromosome FASTA file and store the output in a file called
aacct-hits.txt. - Count the number of chromosomes in the P. falciparum reference genome fasta file.
- Store the chromosome identifiers of the P. falciparum reference genome fasta file in a file.
- Store the last 40 lines of
PF0512_S47_L001_R1_001.fastqin a file namedPF0512_S47_L001_R1_001.subset.fastq. - How many penguin records are there for each island in
penguins.csv? Hint: Try to do it in one go, withoutgrep, by combining multiple pipes (cut,sortanduniq). - How can you count the number of unique commands in your command history?
- Extract the header information from
ampliseq-variants.vcf, sort it alphabetically, and store it in a file namedvcf-header.txt.
7.5 Summary
- VCF files are used to store genetic variant information
- Data streams: stdin, stdout and stderr
- Redirecting output to a file to replace (
>) or append (>>) - Redirecting errors to a file (
2>) - Piping the output of one command to the input of another command via
|