4. Working with remotes#
This section will teach you the basics of working with remote repositories, an import pre-requisite for collaborating with git.
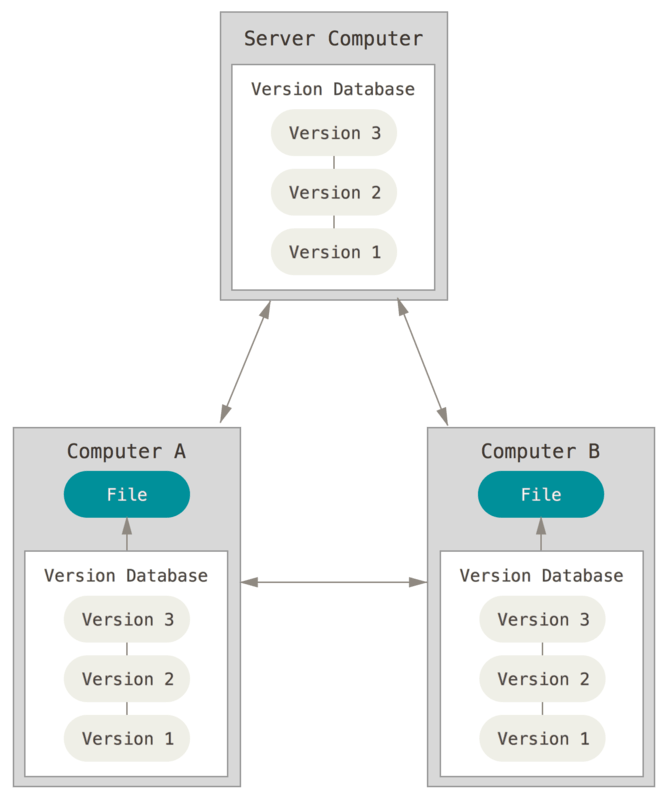
Up until now, we have been using git locally on our own machines. In most cases however, we also use a remote repository on a git server like GitHub or Bitbucket to store a copy of our repo. In git, all contributors as well as any remote servers, store a full copy of the repository, including the full history of all commits and the branch structure. This distributed nature is what allows for easy collaboration with others and even makes it possible to perform more advanced methods of sharing (like working on multiple different remotes that are accessible by different parties).

Git is a distributed version control system. Source: https://git-scm.com/book/en/v2/Getting-Started-About-Version-Control#
See also
4.1. Creating and pushing to a remote repository#
The following section will be explained from the perspective of Bitbucket, but the steps are similar for any git server.
Instructions
Create a new repository on Bitbucket under your own workspace. Do not let Bitbucket include a readme or
.gitignorefile for you, just make a bare repo.Add the new remote repository to your local repo and name it
origin.Push your local
masterbranch to the remote under the same name.
To create a new repo on Bitbucket, follow the instructions listed in their documentation.
The next steps are usually listed as an example in the empty repository. The basic command is git remote add <local-shortname> <remote-url>:
git remote add origin git@bitbucket.org:pmoris/git-collab.git
git push -u origin master
The -u flag stands for --set-upstream and it sets your local branch (master) to track an upstream one with the same name (origin/master), setting up this association for any future push or pull operation. I.e. when you are on the master branch, git push will now automatically push your local master to the remote master branch, without needing to specify it.
Note
To setup an HTTPS connection instead of an SSH one, the URL needs to be slightly different: https://pmoris@bitbucket.org/pmoris/git-collab.git. However, unlike SSH, HTTPS requires you to supply a username and password every time you communicate with the remote (unless you setup a credential cache).
After pushing to the remote, a local remote-tracking branch named origin/master is created. More on remote branches later, but in a nutshell, it is a local reference that keeps track of the state of the master branch on your remote named origin.
Warning
Whenever you want to push an already initialized repository to a remote, make sure that you do not let the git server initialize the repo with any files. If you were to do so, you would already end up with conflicts the first time you try to push your changes.
Let’s give that a try!
Instructions
Create another new repository on Bitbucket under your own workspace. This time, do let Bitbucket include a readme.
Add the new remote repository to your local repo as
borked.Push your local
masterbranch to the new non-empty remote.
After creating a new repository on Bitbucket, bearing the original name git-collab-2 in my case, you can add it to your repository as an additional remote.
git remote add borked git@bitbucket.org:pmoris/git-collab-2.git
This goes to show that you can setup your local repository to connect to multiple different remote repositories. They can be on different git servers, or even different locations on your own machine.
Next, we attempt to push our local master branch to this new remote:
git push borked master
Enter passphrase for key '/home/pmoris/.ssh/id_ed25519':
To bitbucket.org:pmoris/git-collab-2.git
 ! [rejected]        master -> master (fetch first)
error: failed to push some refs to 'git@bitbucket.org:pmoris/git-collab-2.git'
hint: Updates were rejected because the remote contains work that you do
hint: not have locally. This is usually caused by another repository pushing
hint: to the same ref. You may want to first integrate the remote changes
hint: (e.g., 'git pull ...') before pushing again.
hint: See the 'Note about fast-forwards' in 'git push --help' for details.
As you can see, git rejected our push because there were differences between the local repository and the remote one. You can use git log and compare the output to commit history of the remote repo. The latter contains one unique initial commit that was created you instructed Bitbucket to add a readme.
Also note that this time we used the full push command git push <remote> <branch>, without setting up an upstream reference.
You could resolve this by issuing a git push --force. In most cases this is a very dangerous (!) command that you should avoid using, especially when collaborating with others! It is one of git’s destructive commands that could erase work that was done, not just by you - like it is the case for git reset --hard or git checkout -- <filepath> - but also work that was done by other contributors. In this case though, where you just created a new repository, it can be used to resolve this issue.
Note
Here are a few additional commands that you might find useful for managing remote repositories:
Show remotes:
git remote(additionally, try adding the-vflag).Update remote data:
git fetch <remote>or use--allto not specify a specific remote (more on fetching later).Retrieving a remote URL:
git remote show <remote>(check what is says under “tracked”, it shows the associations set up by that--set-upstreamcommand we saw earlier).Renaming remotes:
git remote rename <old-remote> <new-remote>.Removing remotes:
git remote remove <remote>.