CalcUA HPC tips and tricks
A bioinformatician’s survival guide
Goal of this talks
Provide an overview of various tips and tricks for using the CalcUA HPC (or other remote servers) and hopefully make you more productive.

SSH config files
SSH config
You can create an SSH config file in your local (!) user/home directory (e.g., ~/.ssh/config) that allows you to simply type ssh calcua to connect, without needing to provide your username, the login URL, your private key, etc.
Advanced SSH config
# generic options for all hosts
Host *
    # prevent timeouts
    ServerAliveInterval 60  # ping every 60 seconds
    ServerAliveCountMax 10  # number of failed attempts before disconnecting
    # Ignore SSH keys expect the ones specified in Host subsection
    IdentitiesOnly yes

# calcua-specific options
Host calcua
    HostName login.hpc.uantwerpen.be
    User vsc20380
    IdentityFile ~/.ssh/id_ed25519
    ForwardX11 yes                                  # enable GUIs
RemoteCommand tmux new -A -s green-hills-zone # connect straight to a tmux sessionOf course, you can also set up an alias as an alternative
alias tardis='ssh vsc09001@login.hpc.uantwerpen.be'
Add this to the .bashrc or .bash_aliases file on your local machine (or find the equivalent options in your WinSCP/PuTTY/MobaXterm settings).
Remote SSH
Connecting your editor via remote SSH
Several editors support a feature to remotely connect to a server over SSH. Examples include VSCode, VSCodium, the JetBrains suite, Zed, etc.
- Directly connect your editor to a remote server allowing you to view and edit files that are stored remotely.
- It can even work as a file transfer tool in a pinch!
- Some editors offer the same for WSL (which you should be using if you are stuck on Windows) or containers.
Note
Live demo!
A few words of caution on remote SSH in VSCod(ium)
Avoid polluting your home directory and exceeding disk quotas
By default, VSCode will store all the components it needs + a cache in your home directory. Due to the limited quota, you should change this location to the data partition inside VSCode’s settings.json file:
Or better yet (since VSCode does not always seem to respect this option, and VSCodium does not offer it yet), create a symlink yourself:
(Thanks @Robin-Verschoren!)
For more info on why to use this storage partition, check out CalcUA VSC storage location guidelines and slide 131 in the training presentation.
Mind your I/O - be kind to your colleagues
Depending on how large the folders are that you have checked out, as well as which kind of extensions you are running which might attempt to index all files therein, this could put a lot of strain on the shared (scratch) disks.
If you ever notice a long latency between executing a command and regaining a prompt, even for lightweight commands, this might (partially) be why.
Don’t let it happen to you.
Remote SSH - keys and config files
Be mindful of where your SSH keys live!
For Windows users that rely on WSL to access CalcUA, keep in mind that VSCode will be default search your Windows user’s directory for SSH keys and config files, which are not the same as the ones in your WSL home directory.
You can either copy your keys to Windows or set the absolute path to the SSH config file (but then it will likely only work while WSL is running): "remote.SSH.configFile": "".
Mandatory acknowledgment of all the vim/emacs users out there
(and a little tip regarding dotfiles)
Using a light-weight IDE that you can run anywhere of course has its advantages over the hoops that you need to jump through for these GUI IDEs. For anyone interested in exploring this direction, check out doom emacs, spacemacs or neovim.
These tools save their settings in dotfiles (small configuration files that live in your home directory).
Things like your .bashrc or .bash_aliases file also fall in this category.
If you’d like to streamline your environment between your own machine and remote servers like CalcUA, you can store and sync your dotfiles via git or a dedicated tool like yadm or chezmoi.
Hopping between login and compute nodes
You can use SSH to jump between nodes.

- Finding your way back to a particular
tmuxsession on a different login node (see persistent session section). - Monitoring the resource usage of a compute node.
How?
- For login nodes:
ssh login1/2 - For compute nodes:
- Grab the full node name from
squeue(see squeue section) ssh r1c05cn3.leibniz
- Grab the full node name from
Tip
Make sure you have a valid SSH key configured and authorized in your CalcUA home directory (~/.ssh):
~/.ssh/id_rsa+~/.ssh/id_rsa.pub~/.ssh/authorized_keysshould contain a copy of the public key
Example
vsc20380 @ login1 /scratch/antwerpen/203/vsc20380/test-area
└─▶ sbatch -A ap_itg_mu --partition=broadwell slurm-sleep.sh
Submitted batch job 2141426

vsc20380 @ login1 /scratch/antwerpen/203/vsc20380/test-area
└─▶ squeue
   JOBID                                               NAME  PARTITION    STATE       TIME    TIME_LEFT             END_TIME TIME_LIMIT          SUBMIT_TIME  NODES NODELIST(REASON)
 2141426                                sleeping-on-the-job  broadwell CONFIGUR       0:03         4:57  2025-06-17T10:11:04       5:00  2025-06-17T10:06:04      1 r1c05cn3.leibniz

vsc20380 @ login1 /scratch/antwerpen/203/vsc20380/test-area
└─▶ ssh r1c05cn3.leibniz
Enter passphrase for key '/user/antwerpen/203/vsc20380/.ssh/id_rsa':
Last login: Tue Jun 17 10:06:40 2025

vsc20380 @ r1c05cn3 ~
└─▶
Example
vsc20380 @ login1 /scratch/antwerpen/203/vsc20380/test-area
└─▶ sbatch -A ap_itg_mu --partition=broadwell slurm-sleep.sh
Submitted batch job 2141426

vsc20380 @ login1 /scratch/antwerpen/203/vsc20380/test-area
└─▶ squeue
   JOBID                                               NAME  PARTITION    STATE       TIME    TIME_LEFT             END_TIME TIME_LIMIT          SUBMIT_TIME  NODES NODELIST(REASON)
 2141426                                sleeping-on-the-job  broadwell CONFIGUR       0:03         4:57  2025-06-17T10:11:04       5:00  2025-06-17T10:06:04      1 r1c05cn3.leibniz

vsc20380 @ login1 /scratch/antwerpen/203/vsc20380/test-area
└─▶ ssh r1c05cn3.leibniz
Enter passphrase for key '/user/antwerpen/203/vsc20380/.ssh/id_rsa':
Last login: Tue Jun 17 10:06:40 2025

vsc20380 @ r1c05cn3 ~
└─▶ top
top - 10:07:34 up 17 days, 11:55,  1 user,  load average: 0.11, 2.02, 6.44
Tasks:   5 total,   1 running,   4 sleeping,   0 stopped,   0 zombie
%Cpu(s):  0.0 us,  0.0 sy,  0.0 ni,100.0 id,  0.0 wa,  0.0 hi,  0.0 si,  0.0 st
MiB Mem : 128785.8 total, 109782.4 free,   1515.7 used,  17487.7 buff/cache
MiB Swap:  10240.0 total,  10212.5 free,     27.5 used. 121938.3 avail Mem

    PID USER      PR  NI    VIRT    RES    SHR S  %CPU  %MEM     TIME+ COMMAND
1969012 vsc20380  20   0   13624   3276   2948 S   0.0   0.0   0:00.00 bash
1969016 vsc20380  20   0    8048    920    848 S   0.0   0.0   0:00.00 sleep
1969028 vsc20380  20   0   89564   9604   8300 S   0.0   0.0   0:00.02 systemd
1969036 vsc20380  20   0   38924   9244   3864 S   0.0   0.0   0:00.07 bash
1969214 vsc20380  20   0   73252   4552   3820 R   0.0   0.0   0:00.00 top
Running GUI tools on CalcUA
OnDemand access via Web Portal
I only discovered this myself very recently: VSC Web Portal access:
- File transfer
- Shell access
- Job monitoring
- Interactive applications (like Jupyter, RStudio, IGV, etc.)
- Gateway/tunnel for e.g. VSCode
Accessible via https://portal.hpc.uantwerpen.be/
Running GUI tools on CalcUA via X11
It is possible to run GUI tools on CalcUA, on both the login nodes and during interactive compute jobs.
This allows you to e.g., run IGV or GW on a large bam file without downloading it or the reference fasta to your own machine.
To enable this option, use:
Some tips
- Certain tools might not work (at all or specific functionality like a file open dialogue) because they rely on a newer version of GTK which is not available on CalcUA (e.g. QuPath).
- In this case, you might be able to force the tool to run using an older version by launching it with the flag
-Djdk.gtk.version=2.
- In this case, you might be able to force the tool to run using an older version by launching it with the flag
- Do not pass the
--x11command at the end of yoursruncommand, because it will be interpreted as being part of--pty bash. - Be warned that IGV might be (even) slow(er than usual).
RStudio Server
For certain types of analysis in R (like scRNA-seq), where you need both interactivity and compute power, you can make use of the RStudio Server module on the CalcUA web portal (or even spin up your own singularity containerized version of it).
This approach is compatible with both existing R modules (like R-bundle-Bioconductor) and your own locally installed R packages.
Tip
In many cases, testing your code on a representative small test dataset is the better approach, but for things like deciding on clustering or QC thresholds, this might not be feasible.
Persistent SSH sessions
How to avoid timeouts during long-running commands?
- Commands on login/interactive nodes are cancelled after some time.
- Problematic when copying or downloading a large amount of data, or during interactive
srunjobs. - Solution: use
tmuxorscreento create a persistent session that remains active even if you log out (or are disconnected on a flaky connection).nohupworks as an alternative for single commands.
Pretty squeue
Pretty squeue
Add this to your .bashrc or .bash_aliases file for a more readable job output:
Pretty squeue
└─▶ /usr/bin/squeue
             JOBID PARTITION     NAME     USER ST       TIME  NODES NODELIST(REASON)
           2036034 broadwell the-answ vsc20380  R      30:36      1 r3c08cn3.leibniz


└─▶ squeue --format="%.8i %.50j %.10P %.8T %.10M %.12L %.20e %.10l %.20V %.6D %.R"
   JOBID                                               NAME  PARTITION    STATE       TIME    TIME_LEFT             END_TIME TIME_LIMIT          SUBMIT_TIME  NODES NODELIST(REASON)
2036034 the answer to life the universe and everything broadwell RUNNING 30:37 2-23:29:23 2025-05-17T12:01:44 3-00:00:00 2025-05-14T12:01:34 1 r3c08cn3.leibniz- Especially useful if you use long job names.
- Downside: widths are fixed and terminal window needs to be wide enough to fit everything in.
Transferring files
Never underestimate the bandwidth of a station wagon full of tapes hurtling down the highway.
~Andrew Tanenbaum, 1981
File transfers on CalcUA
For an overview of different methods to transfer data to CalcUA, we refer to the VSC documentation. In brief, you can use:
- options like
rsyncorsftpfrom a terminal - a dedicated GUI SFTP tool like
FileZilla(bundled adware in the past) or WinSCP (or even directly from within MobaXterm if you are using it for access anyway) - Globus data sharing platform
- Belnet FileSender: useful for sharing large datasets with others
- rclone for moving data from CalcUA to OneDrive or SharePoint
Of course, aside from data, git can take care of synchronizing your code. You are using git, aren’t you?
Globus
I won’t go into much detail here, but this is what you probably should be using whenever it is feasible (i.e. collaborators also have access to it).
See the excellent VSC docs for more info.
Belnet FileSender
- Belnet FileSender can be used to transfer large (volumes of) files.
- However, its basic usage works through a portal in your web browser, which means that your PC must stay awake during the upload/download.
- Moreover, since you cannot open a web browser on the CalcUA (unless you try your hand at X forwarding), you cannot download any files from FileSender to CalcUA directly.
- Fortunately, there is an API you can call through a Python script, which makes it possible to upload files directly from the CalcUA.
Belnet FileSender API for uploading - setup
Installing the script and generating a config file:
# download script
curl https://filesender.belnet.be//clidownload.php > ~/.local/bin/filesender.py

# Save `filesender.py.ini` config file and store it in home `~/.filesender`
curl https://filesender.belnet.be//clidownload.php?config=1 > ~/.filesender.py.ini
Next, generate an API key on your belnet profile page and add it alongside your username (email) to the ~/.filesender.py.ini config file.
Belnet FileSender API for uploading - usage
Now you can transfer files via:
python3 filesender.py -v \
  -m "Message description" \
  -s "Sent using the Belnet filesender API" \
  -r "the.librarian@unseen-university.ank" \
  $VSC_SCRATCH/clacks/*.fastq.gz
You can run this either in a Slurm batch job or through a tmux/screen session, to avoid time-outs.
Belnet FileSender - more info
For more information, see:
Rclone - connecting to SharePoint
What is Rclone?
The rclone tool makes it easy to quickly transfer (large amounts of) data between various supported endpoints, like your machine and cloud storage.
For example, it could be used to connect CalcUA to OneDrive or SharePoint, e.g. for easier data sharing, downstream analyses on your local machine or even longer-term storage without eating up storage space on your CalcUA account.
Create a new Rclone remote
First, you will need to create an rclone remote that targets OneDrive or Sharepoint:
# create a new rclone remote for OneDrive or SharePoint
rclone config

# an interactive setup will open and you will need to choose the following options:
- new remote
- name it e.g. `personal-onedrive` or `sharepoint-sitename`
- type: 33 ( Microsoft OneDrive \ "onedrive" => use the same type for SharePoint)
- client id: leave blank
- client secret: leave blank
- region: 1 (Microsoft Cloud Global \ "global")
- do not edit advanced config
- use browser to authenticate: no
- on your local machine (with rclone installed), run:
    rclone authorize "onedrive"
- config_token: paste the result from above here
Transferring files with rclone
To transfer files, you can use a similar syntax to rsync:
Too many small files or large volumes of data
Most file systems can be brought to their knees when creating large amounts of small files. Doing so might invoke the wrath of the system admins, but unfortunately you cannot also control the behaviour of existing tools.
Similarly, you might face a situation where a program creates a large total volume of intermediate data that you do not really need, but which causes your jobs to fail when they invariably bump into your storage quota.
So what can you do?
Meet $TMPDIR…
The first option is to write temporary files to the job node’s SSD.
- Path =
$TMPDIR(or$VSC_SCRATCH_NODEor just/tmp) - Data will be cleared/inaccessible after the job finishes
- Especially useful for nextflow pipelines
- Size depends on the cluster (~100-200 GB)
…and /dev/shm
- Mount directory into RAM as
tmpfsfile system instead of using persistent disk storage. - Eats into the total RAM available to your job.
- For large amounts of data a high memory node might be required.
- Might be more useful for large amounts of small files.
- Ephemeral just like
/tmp - Use cases:
SPAdes,Trinity,OpenFOAM, etc.
(Thanks go to Franky for sharing this arcane knowledge.)
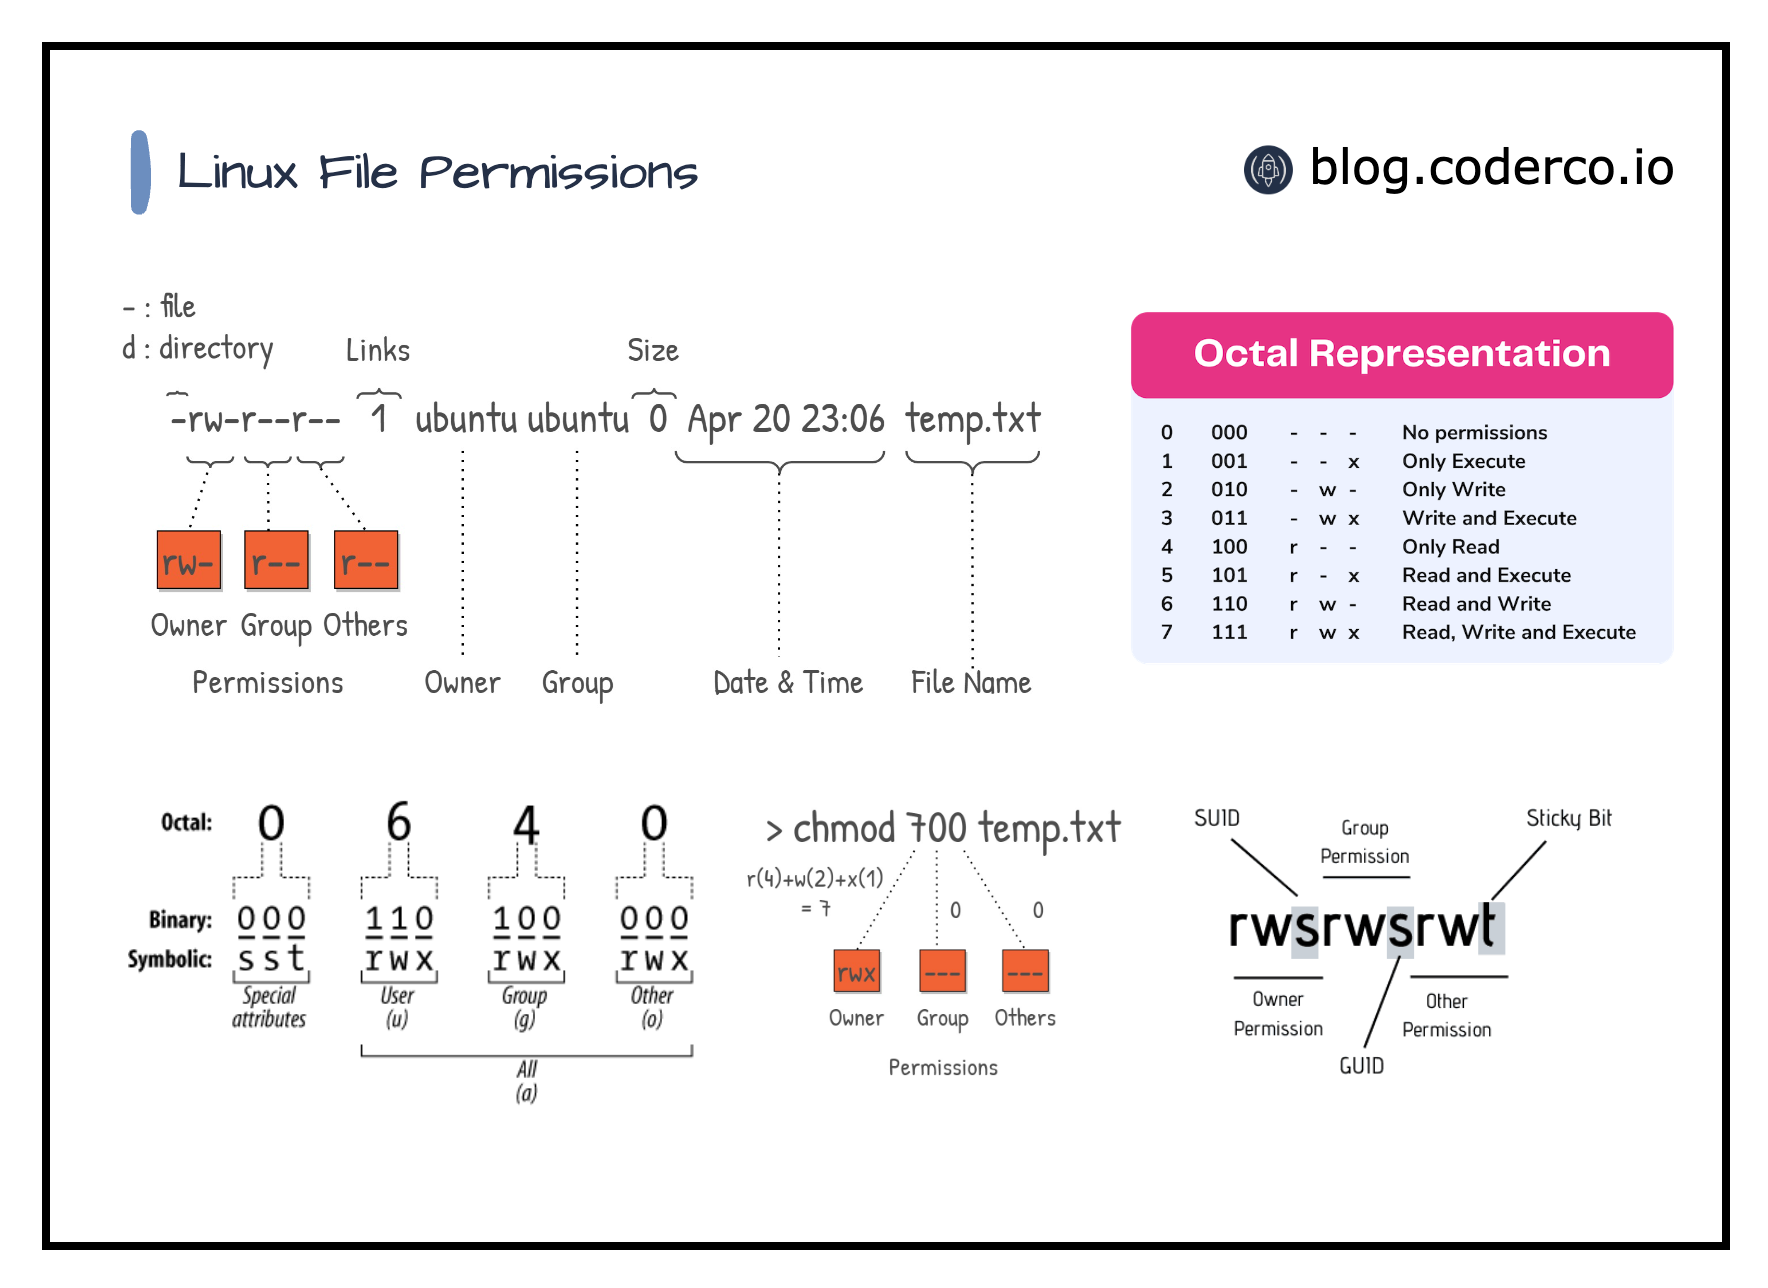
Best practices for file permissions
File ownership and permissions
After transferring files to the CalcUA for long-term1 storage (e.g., raw data stored on
/data/antwerpen/grp/ap_itg_*), file permissions can be set toread-onlyto avoid accidental removal or modification.
Bulk changing permissions
# for all files in a directory (and its subdirectories)
find <path> -type f -exec chmod 440 {} +

# for individual files
chgrp ap_itg_mu <file names or glob pattern>
chmod 440  <file names or glob pattern>

# just removing the write flag from a file
chmod -w <file names or glob pattern>

# do not set the 440 flag directly on directories,
# and do not set it using the recursive (-r) flag either,
# because this would make them inaccessible/untraversable
# (because directories need execution permission)
# use the instead:
find . -type d -exec chmod 550 {} +
Storage quotas are determined by a combination of the group owner and the storage location
# setting ownership

# will count towards ap_itg_mu group's data quota
chown -R <vsc-username>:ap_itg_mu /data/antwerpen/grp/ap_itg_mu/projects/<name>

# will count towards aitg group's scratch quota
chown -R <vsc-username>:aitg /scratch/antwerpen/grp/aitg/arosanas/projects/<name>

# or to do it recursively for all files and directories in a specific location
find <path-to-folder> -user <username> -group <groupname> -exec chgrp <groupname> {} \;
Checksums and file integrity

Obligatory XKCD - Digital Data
When storing (and transferring) files, a good habit to develop is using file checksum integrity tests.
# create a single md5 checksum file for all files in the current directory (or below)
find . -type f -exec md5sum "{}" + | tee checksum-$(date +%F).md5

# recursively verify all files listed in any MD5.txt in the current location
find . -type f -name "MD5.txt" -execdir bash -c 'md5sum -c {}' \;
For more info, please refer to https://genomicsaotearoa.github.io/shell-for-bioinformatics/2_download_data/.
HPC container wrapper as a conda/mamba alternative
Tip
As a side note, I recommend to use the miniforge distribution rather than conda/miniconda due to licensing and historically better package management/coverage/architecture support.
Using conda (and to a lesser extent pip) is frowned upon
We discourage the use of Conda-variants for various reasons. It should only be used if nothing else works.
- Disk space / file quota
- Not always optimized for specific CPUs (e.g. Intel MKL math libraries, openBlAS, AMD Math Core Library)
- Security concerns
But sometimes, being able to use conda just makes your life so much easier…
File quota
File quota
└─▶ myquota
file system /user/antwerpen
    using 1.612G of 3G space, 5,187 of 20k files
file system /data/antwerpen
    using 82.99G of 128G space, 157,497 of 200k files
└─▶ conda env list
# conda environments:
#
base * /data/antwerpen/203/vsc20380/miniforge3
never /data/antwerpen/203/vsc20380/miniforge3/envs/never
gonna /data/antwerpen/203/vsc20380/miniforge3/envs/gonna
give /data/antwerpen/203/vsc20380/miniforge3/envs/give
you /data/antwerpen/203/vsc20380/miniforge3/envs/you
up /data/antwerpen/203/vsc20380/miniforge3/envs/upFile quota
└─▶ myquota
file system /user/antwerpen
    using 1.612G of 3G space, 5,187 of 20k files
file system /data/antwerpen
    using 82.99G of 128G space, 157,497 of 200k files

└─▶ conda env list
# conda environments:
#
base                 * /data/antwerpen/203/vsc20380/miniforge3
never                 /data/antwerpen/203/vsc20380/miniforge3/envs/never
gonna                 /data/antwerpen/203/vsc20380/miniforge3/envs/gonna
give                  /data/antwerpen/203/vsc20380/miniforge3/envs/give
you                   /data/antwerpen/203/vsc20380/miniforge3/envs/you
up                    /data/antwerpen/203/vsc20380/miniforge3/envs/up
└─▶ du -sh --inodes /data/antwerpen/203/vsc20380/miniforge3/* | sort -hr
107K /data/antwerpen/203/vsc20380/miniforge3/pkgs
10K /data/antwerpen/203/vsc20380/miniforge3/envs
6.0K /data/antwerpen/203/vsc20380/miniforge3/lib
1.5K /data/antwerpen/203/vsc20380/miniforge3/share
798 /data/antwerpen/203/vsc20380/miniforge3/include
132 /data/antwerpen/203/vsc20380/miniforge3/bin
...Conda clean
If you cannot avoid a regular conda install, at the very least remember to clear out your cache every now and then:
Conda clean
If you cannot avoid a regular conda install, at the very least remember to clear out your cache every now and then:
Conda clean
If you cannot avoid a regular conda install, at the very least remember to clear out your cache every now and then:
└─▶ conda clean --all
Will remove 69 (130.8 MB) tarball(s).
Proceed ([y]/n)? y

Will remove 1 index cache(s).
Proceed ([y]/n)? y

Will remove 173 (1.97 GB) package(s).
Proceed ([y]/n)? y

There are no tempfile(s) to remove.
There are no logfile(s) to remove.
└─▶ du -sh --inodes /data/antwerpen/203/vsc20380/miniforge3/
29K /data/antwerpen/203/vsc20380/miniforge3/A different approach to using containers
hpc-container-wrapper (formerly known as Tykky)
- A tool to wrap your Python environment into an Apptainer/Singularity container, designed for use on HPC systems.
- Uses
environment.yml(conda/mamba) orrequirements.txt(pip) to define packages - Provides “wrapped” binaries to call Python (or other tools) inside the container.
Creating containers
Define dependencies in environment.yml (conda/mamba) or requirements.txt (pip):
Containers binaries
└─▶ ll wgs/wgs-container/
total 2313043
drwxrwxr-x 2 vsc20380 vsc20380        341 May  8 16:36 _bin
drwxrwxr-x 2 vsc20380 vsc20380        343 May  8 16:36 bin
-rw-rw-r-- 1 vsc20380 vsc20380       2541 May  8 16:36 common.sh
-rwxrwxr-x 1 vsc20380 vsc20380   69107712 May  8 16:36 container.sif
-rw-rw-r-- 1 vsc20380 vsc20380 2396106752 May  8 16:36 img.sqfs
drwxrwxr-x 3 vsc20380 vsc20380          3 May  8 16:36 share

└─▶ ll wgs/wgs-container/bin/
total 857
-rwxrwxr-x 1 vsc20380 vsc20380 1575 May  8 16:36 _debug_exec
-rwxrwxr-x 1 vsc20380 vsc20380 1577 May  8 16:36 _debug_shell
-rwxrwxr-x 1 vsc20380 vsc20380 2254 May  8 16:36 ace2sam
-rwxrwxr-x 1 vsc20380 vsc20380 2245 May  8 16:36 adig
-rwxrwxr-x 1 vsc20380 vsc20380 2248 May  8 16:36 ahost
-rwxrwxr-x 1 vsc20380 vsc20380 2260 May  8 16:36 annot-tsv
-rwxrwxr-x 1 vsc20380 vsc20380 2257 May  8 16:36 annotate
-rwxrwxr-x 1 vsc20380 vsc20380 2266 May  8 16:36 annotateBed
-rwxrwxr-x 1 vsc20380 vsc20380 2254 May  8 16:36 aserver
-rwxrwxr-x 1 vsc20380 vsc20380 2257 May  8 16:36 bamToBed
-rwxrwxr-x 1 vsc20380 vsc20380 2263 May  8 16:36 bamToFastq
-rwxrwxr-x 1 vsc20380 vsc20380 2257 May  8 16:36 bcftools
...
Running containers
- Run
export PATH="$VSC_SCRATCH/containers/wgs/bin:$PATH"at the top of job script, or - Directly call individual binaries, e.g.
$VSC_SCRATCH/containers/wgs/bin/pythonand$VSC_SCRATCH/containers/wgs/bin/fastqc - Python packages are automatically picked up via import statements when using the containerized python binary.
Updating containers
Containers can be updated after creation to include additional packages.
post-install.sh:
Caveats to be aware of
Beware of coreutils!
- Certain conda packages pull in the coreutils package, to provide tools like
ls. - If you add the entire container to your PATH by default (e.g. in
.bashrc), it will hijack all of yourlscalls. - The time it takes to spin up and down the container will add multiple seconds to even these basic system calls, sending you (and perhaps the admins) on a wild goose chase.
This is entirely speculative and not based on a true story.
Caution
The packages provided by conda could still be less optimized than module installed software(?)
Reproducibility
Tip
Remember to store your environment.yml or requirements.txt files (ideally under version control, e.g. git).
Consider whether you need a regular environment file or require conda-lock carefully.
A note on R, RStudio Projects and renv

When working locally, using a mix of RStudio Projects and renv lockfiles is the way to go to keep your projects reproducible and portable.
On CalcUA, as for Python, the preferred approach is to use packages made available in modules instead of redundant local installs.
You can still benefit from projects and package pinning by using vsc-Rproject (optionally combined with renv where need be).
Check the VSC docs for a full walkthrough: https://docs.vscentrum.be/compute/software/installing_software/vsc_rproject.html
Alternatively, you could rely on only loading the main R module and install your own R packages while using renv for versioning (the benefit being that everything is contained in a single lockfile instead of spread across modules too).
In this case though, it is again important to change a few default paths to avoid filling your home directory.
# load R first
module load R/4.5.1-gfbf-2025a

# create a file called .Renviron in $VSC_HOME / ~ with the following content
└─▶ cat >$VSC_HOME/.Renviron <<EOL
R_LIBS_USER=${VSC_DATA}/Rlibs/${VSC_OS_LOCAL}/${VSC_ARCH_LOCAL}/R-${EBVERSIONR}
RENV_PATHS_CACHE=${VSC_DATA}/Rlibs/renv_cache/${VSC_OS_LOCAL}/${VSC_ARCH_LOCAL}/R-${EBVERSIONR}
EOL

# create the directory
└─▶ mkdir -p ${VSC_DATA}/Rlibs/${VSC_OS_LOCAL}/${VSC_ARCH_LOCAL}/R-${EBVERSIONR}# then inside R, verify the library path
> .libPaths()
[1] "/apps/antwerpen/broadwell/rocky9/R/4.5.1-gfbf-2025a/lib64/R/library"
# install renv
> install.packages("renv")
...
# initialise renv
> renv::init()
The following package(s) will be updated in the lockfile:
# CRAN -----------------------------------------------------------------------
- renv [* -> 1.2.2]
The version of R recorded in the lockfile will be updated:
- R [* -> 4.5.1]
- Lockfile written to "/scratch/antwerpen/203/vsc20380/R-local-test/renv.lock".
- renv activated -- please restart the R session.
# restart R
# install packages inside the current directory/project
> install.packages("ggplot2")
...
These packages will be installed into "/scratch/antwerpen/203/vsc20380/R-local-test/renv/library/linux-rocky-9.7/R-4.5/x86_64-pc-linux-gnu".
# save packages to the lockfile
> renv::snapshot() # will only write packages that are used in .R* files in the current project directoryThe lockfile contains an overview of everything you’ve installed:
Tip
If you prefer, you can set another .Renviron option to force renv to create the project-local packages folder (which actually just contains symlinks to the global cache) in a shared directory (e.g. in /data) instead of inside your actual project directory:
RENV_PATHS_RENV=/data/antwerpen/203/vsc20380/renv-shared-lib/
Tip
Make liberal use of saveRDS() and readRDS() to avoid re-computing long-running steps or even split workloads between CalcUA and your local machine.
Nextflow on CalcUA
Running Nextflow on CalcUA
A dedicated nf-core config optimized for CalcUA is available, alongside instructions on how to use it, here:
https://nf-co.re/configs/vsc_calcua/
This config will set various settings like using Singularity/Apptainer containers for running processes (since docker does not work on most HPCs and we do not want to install all required software ourselves).
Quick start - Slurm-scheduled pipeline run
#!/bin/bash -l
#SBATCH --partition=broadwell          # choose partition to run the nextflow head process on
#SBATCH --job-name=nextflow            # create a short name for your job
#SBATCH --nodes=1                      # node count
#SBATCH --cpus-per-task=1              # only 1 cpu cores is needed to run the nextflow head process
#SBATCH --mem-per-cpu=4G               # memory per cpu (4G is default for most partitions)
#SBATCH --time=00:05:00                # total run time limit (HH:MM:SS)
#SBATCH --account=<project-account>    # set project account

# Load the available Nextflow module.
module load Nextflow
# Or, if using a locally installed version of Nextflow, make Java available.
# module load Java

# Set Apptainer/Singularity environment variables to define caching and tmp
# directories. These are used during the conversion of Docker images to
# Apptainer/Singularity ones.
# These lines can be omitted if the variables are already set in your `~/.bashrc` file.
export APPTAINER_CACHEDIR="${VSC_SCRATCH}/apptainer/cache"
export APPTAINER_TMPDIR="${VSC_SCRATCH}/apptainer/tmp"
# optional - set by default in the config already
# export NXF_APPTAINER_CACHEDIR="${VSC_SCRATCH}/apptainer/nextflow_cache"

# Launch Nextflow head process.
# Provide the vsc_calcua profile to use this config and let Nextflow schedule tasks
# using the Slurm job scheduler. For local execution on a single node, see below.
# Note that multiple profiles can be stacked, and here we use the built-in test profile
# of the nf-core/rnaseq pipeline for demonstration purposes.
nextflow run nf-core/rnaseq \
  -profile test,vsc_calcua \
  -with-report report.html \
  --outdir test_output
Quick start - Single-node pipeline run
#!/bin/bash -l
#SBATCH --partition=broadwell          # choose partition to run the nextflow head process on
#SBATCH --job-name=nextflow            # create a short name for your job
#SBATCH --nodes=1                      # node count
#SBATCH --cpus-per-task=28             # request a full node for local execution (broadwell nodes have 28 cpus)
#SBATCH --mem=112G                     # total memory (e.g., 112G max for broadwell) - can be omitted to use default (= max / # cores)
#SBATCH --time=00:05:00                # total run time limit (HH:MM:SS)
#SBATCH --account=<project-account>    # set project account

# Load the available Nextflow module.
module load Nextflow

# Or, if using a locally installed version of Nextflow, make Java available.
# module load Java

# Set Apptainer/Singularity environment variables to define caching and tmp
# directories. These are used during the conversion of Docker images to
# Apptainer/Singularity ones.
# These lines can be omitted if the variables are already set in your `~/.bashrc` file.
export APPTAINER_CACHEDIR="${VSC_SCRATCH}/apptainer/cache"
export APPTAINER_TMPDIR="${VSC_SCRATCH}/apptainer/tmp"
# optional - set by default in the config already
# export NXF_APPTAINER_CACHEDIR="${VSC_SCRATCH}/apptainer/nextflow_cache"

# Launch Nextflow head process that will run on the same node as the pipeline tasks.
# Append the single_node profile after the vsc_calcua one, to make Nextflow schedule
# all jobs on the same local node. Note: don't do this on the login nodes!
nextflow run nf-core/rnaseq \
  -profile test,vsc_calcua,single_node \
  -with-report report.html \
  --outdir test_output
  --outdir test_output
Tip
Be aware that the temporary files created in your work directory can quickly overwhelm your file quota.
In the past, the config was set to automatically prune the work directory on a successful pipeline run, but because this made it more difficult troubleshoot or to run two-step pipelines, this behaviour was reversed.
Use du -sh (--inodes) to monitor this directory and clean it out regularly (either by removing it manually or running nextflow clean in the pipeline directory).
That’s all folks
Many thanks to the CalcUA team and the many researchers/mentors who’ve collectively taught me all these things.
